The Crazy and Confusing World of Lavenders

Lavender Angustifolia – English

It is very difficult to write any new magical words and stunning superlatives in describing Lavenders.

So instead, let’s begin with a whole lot of silly stupid crazy. What we may commonly know and believe as a particular lavender variety, may not be quite so. Where history, ancestry and classification are so important in the horticultural world, lavenders stand alone in their messy maze of confusion of origin and labelling. So let’s begin.

English lavender is not actually at all English but is native to the Mediterranean. French lavender is not actually French but is native to Spain. Italian lavender is not actually Italian but is an early hybrid of the Spanish, for example L. Avonview. Spanish lavender is not actually only Spanish but is native to the broad lower Mediterranean and northern Africa. Then there are the Dutch, the Portuguese and the Asia Minor varieties but I am not even going to attempt to go there.

Thus, the lavenders which today we collectively class as French is not French at all, but actually Spanish or maybe Italian, or a cross between the two, but definitely not French. And the more I research the more weirder and complex it all becomes. This lavender is really that, that lavender is really this, a crazy merry go round of total confusion and now I have fading confidence in reporting what is what.

Though one thing is certain. There are two general types of lavenders.
1. Spica, which include the English L. angustifolia, L. latifolia and L. lanata.
2. Spanish L. stoechas – which include L. pendunculata, L. viridis and L. dentata. However, some term L. stoechas as Italian lavender, Are you keeping up?

Lavender stoechas ‘Kew Gardens’

Regardless of the uncertain and frustrating origins and present day identification and labelling, lavenders are among the most popular plants grown in gardens. With their highly aromatic flowers and foliage, the longevity of their flower season, their ease of care, its frost, heat and drought tolerance and probably greatest of all, a major magnet for bees, they are the must have plant for any garden. A true bingo.

In response to their extraordinary popularity, the nursery I work at has a long and wide bench of 3-tiered shelving, and a good 6 metres in length, solely dedicated to lavenders, with probably 30 or more different varieties and hybrids on offer. In spring and summer when they are in full flower, it is swarming with dizzying buzzing bees and very determined customers. At these times, it seems like it is the survival of the brave.
The name Lavander comes from the Latin ‘lavare’, to wash, which alludes to the ancient custom of scenting water for the toilette with lavender oil or a few lavender leaves and flowers.
Following is my humble and valiant attempt to understand and convey some sort of sense about lavenders.

Varieties

L. dentata.- French lavender
It is actually native to Spain and is also known as the fringed lavender for their bright grey green narrow leaves with defined toothed margins. While not as fragrant as other lavenders, its leaves have a rich lavender-rosemary scent. The spikes of lavender blue flowers, bloom from spring to autumn. The bush will grow to about 90cm in height and width and can also be a great choice for coastal gardens.

A natural hybrid of L. dentata is L. allardi. It is a more vigorous variety growing to 1.5 in height and width. Amazingly even in the worst miserable winter weather, they are smothered in flowers. I guess they are rarely if ever pruned, yet are still clothed top to bottom with foliage and flowers.

                                      Lavender stoechas ‘Avonview’

Lavandula Stoechas
Here lies the big bang of confusion and uncertainty. L. stoechas are generally known as Spanish lavender. However, they are also called French, Italian or butterfly lavender. They are native to the lower Mediterranean and northern Africa. Are you still with me? Here I shall collectively call them Italian, no, French is maybe better, but its truest classification is Spanish. Anyway, these lavenders’ fragrance is a mix of camphor and rosemary. Its great attraction and popularity are twofold. First, is its ability to repeat flower from spring to late summer, even through to autumn, and second for its exquisite striking flowers, with various shades of purple, blue, pink or white inflorescences at their tips, topped with distinctive upright tassels of varying colours.
Many declare they become leggy and unruly, and very soon are full of gnarled exposed wood and sport very few flowers. This is a direct result of poor and infrequent pruning, which can be difficult to time, since they seem to never shut up flowering. If you can, aim for three prunings a year. You should not ever prune back to hard, just to below the outer surface of foliage behind the old flowers. If they are an outright eyesore yank them out, for life is far too short to put up with a whole lot of ugly.
Lavandula angustifolia – English lavender.
It is native to the Mediterranean. The flowers are held atop elongated thin stems and flower throughout the height of summer. Their foliage is highly aromatic when brushed against or crushed.

Lavender x Intermedia Grosso

The English is the one you associate with lavender fields. Grown commercially, it is cultivated for its high quality lavender oil. L. angustifolia x intermedia ‘Grosso’ is the dominant hybrid grown. It is a cross between L. angustifolia and the Portuguese variety L. latifolia, both Spica varieties. Thus, it has the cold hardiness of the English and the heat tolerance of the Portuguese.
Personally, Grosso is easily my undoubted favourite and unchallenged for its great decorative appeal with or without its flowers, 365 days a year. One of its great bonuses it is blessed with beautiful stunning steel silver foliage. If you want to plant a lavender this is the one. Its growth is larger than the common English varieties and when mature and in flower, a good metre in height and width.
One of the great advantages of the English is their ease of maintenance. It requires only an annual single good clip after flowering to just down below the top of the foliage. What will be left is a sculptural, tight, steely grey, round mound, akin to a stemless mushroom or a Miss Muffet’s Tuffet, a great structural element in any good garden design.
There are the smaller growing varieties of Hidcote and Munstead, named after iconic, old established gardens in rural England. Both now are National Trust gardens. They also are popular and generally available in punnets or tube stock, so are quite cost effective for both small and large landscaping endeavors.


Cultivation
Heavy and clay soils may be your only foe or nemesis, for lavenders desire a relatively free draining soil. In heavy soils they are perfect for sloping sites or terraced built up areas.
When first planting, regular watering is suggested to get their root systems established and then once mature, little to no watering is needed.
If you are up to it and want top notch lavenders, you can apply lime in spring and autumn blood and bone. You can also add potassium in spring for more intense colour and stem strength. And don’t forget the application of Seamungus, for the overall health of the soil and the plant, and its ability to counteract stress due to heat and drought.
So be it Spanish, Italian, French, English or Portuguese, and the endless hybrids bred from them, they are all lavenders worthy of inclusion in any garden. I have thought about just collectively calling them all European lavenders, but then I forgot to include the north African and Asia Minor varieties.
Please see my blog about using Lavender Grosso in creating a simplistic, low maintenance yet visually stunning garden design. It is a ripper.
Amid the confusion, happy gardening and just have fun,
Regards Ned McDowell

Hydrangeas – The Grand Dame of Summer Flowers

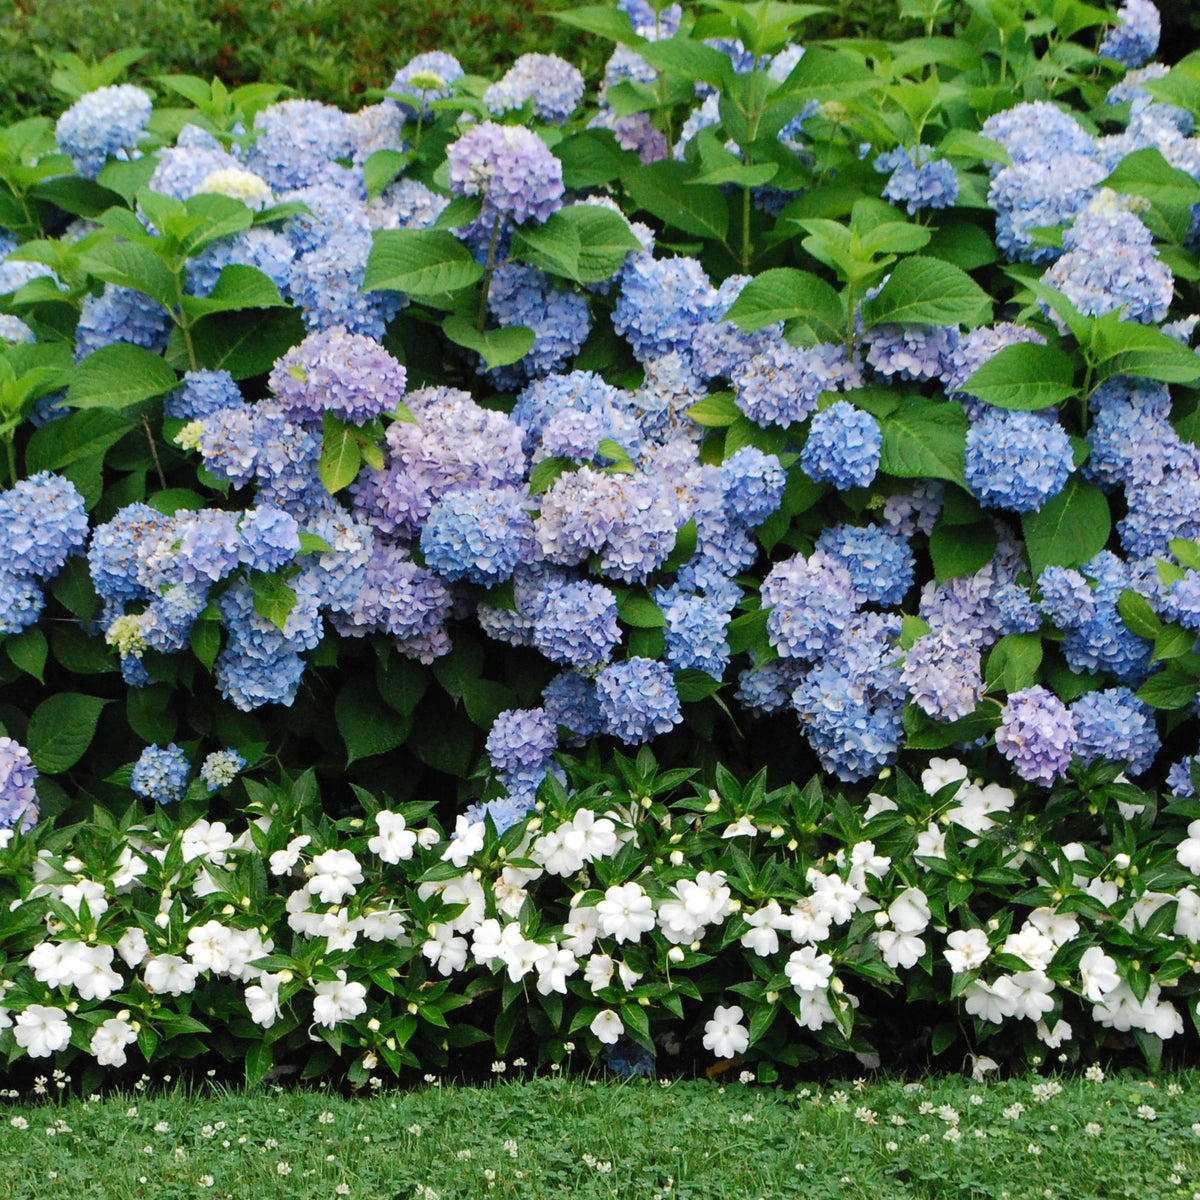
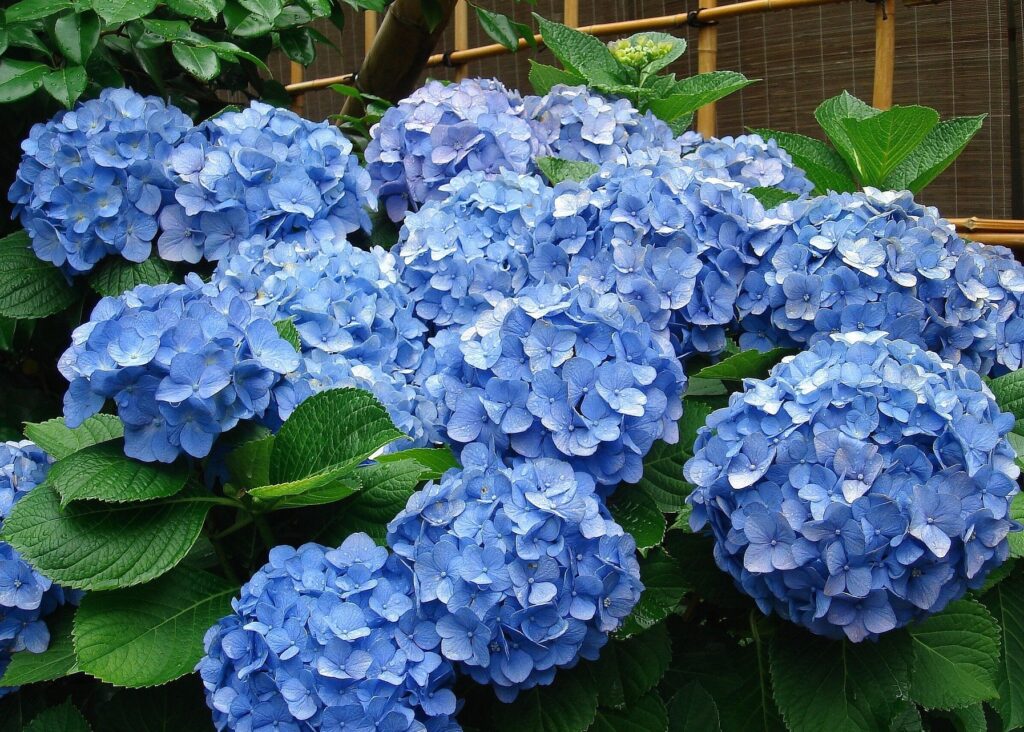
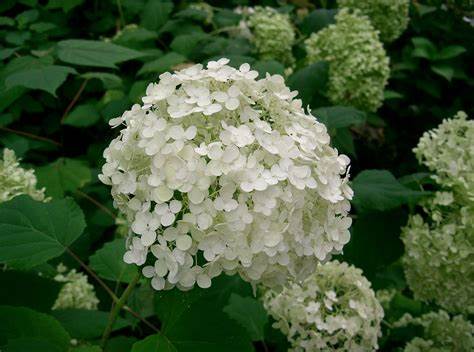
                                                  Hydrangea Macrophylla Mop Top

For me the blooms of hydrangeas are the grandest of all summer dames. It is a love affair pure and true, and long shall it always remain so.

Unless I kill one, which is quite often. Then it is a whole bunch of shameful embarrassment and silent heartbreak, stupid, stupid me. But life is all about learning lessons, and in respect to growing new young hydrangeas I sure need a lot of them, me thinks the information held within the full size of an encyclopedia would be just about perfect.

History 

The Hydrangeas we most commonly cultivate today originated in Japan and China. Their natural habitats possess an overall cool climate with very generous rainfall and protection from full sunlight. Thus, in the Australian climate with its hot baking summers and infrequent rainfall, we are marginally up against it from the get go.

The name Hydrangea was not named, contrary to first assumptions because of the plants ability to consume more water (hydros) than an elephant, but because the seed capsules resemble a small water pitcher. Sad but true.

Varieties 

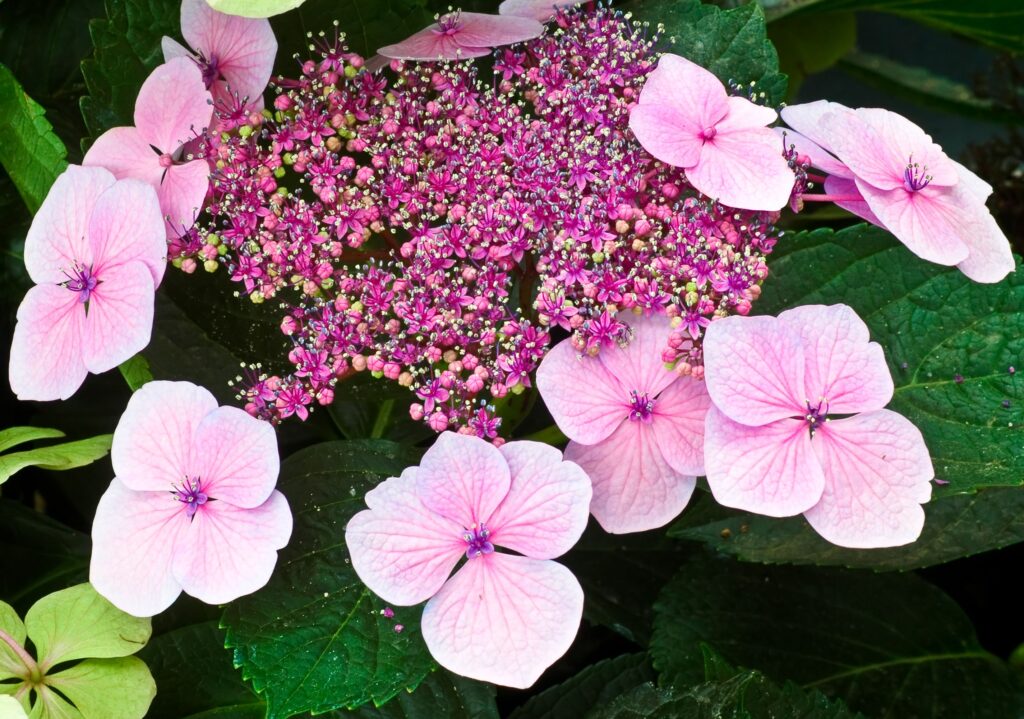
                                                          H. Macrophylla Lace Cap

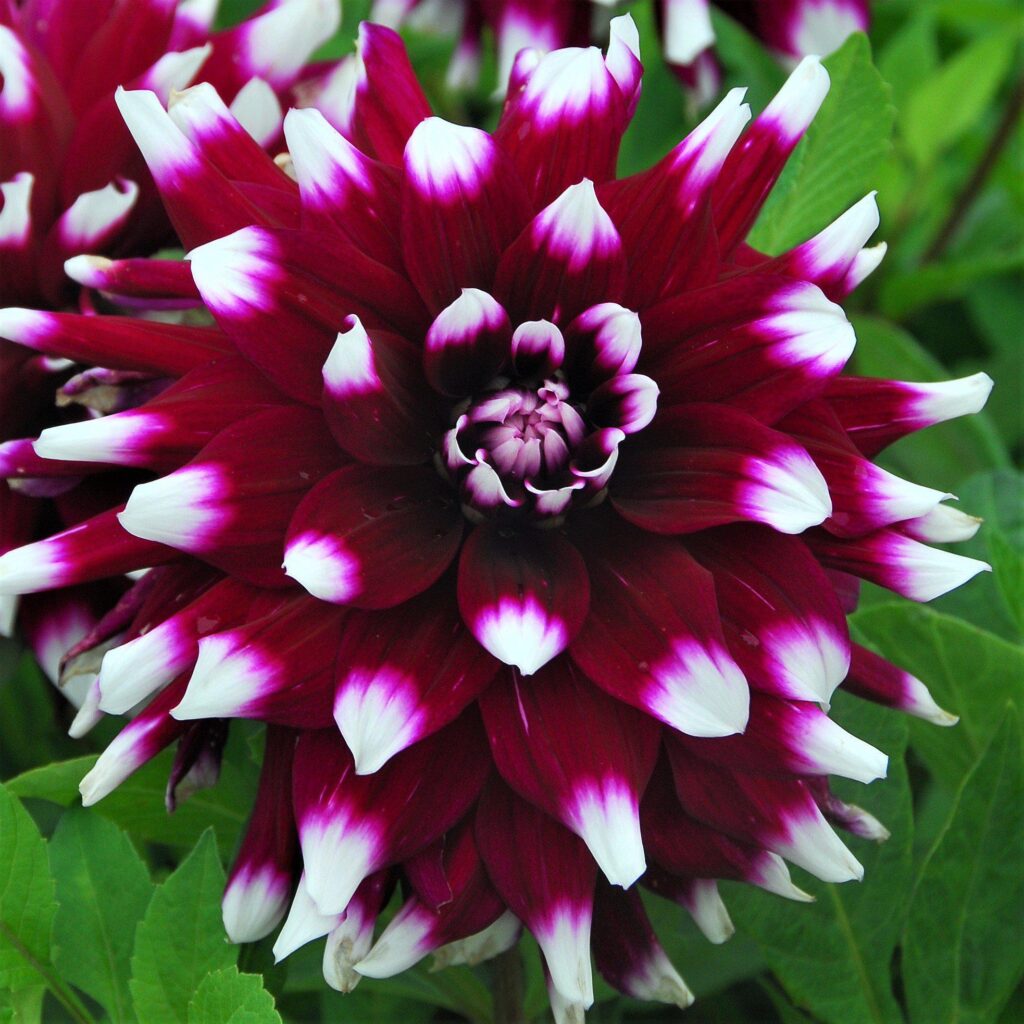
H. macrophylla are by far the most popular. Within this group, there are the two major types or shapes of flower heads, mop tops and lace caps. Mop tops have flower heads made up of a mass of small infertile flowers, where lace caps have a central cluster of fertile flowers surrounded by a fringe of infertile flowers. Newer varieties of lace caps possess bicolour blooms with blue and white or pink and white flower heads. I have many mop tops in my own collection. One is a complete treasure, with both its foliage and flowers gargantuan in size, easily bigger than a dinner plate. Size does indeed count. There is a must have black stemmed variety, which is a perfect foil against the rich green leaves and flowers, and when naked of foliage in winter, is a garden architectural delight in itself.


                                                                      H. Annabelle

Hydrangea purists declare that H. aborescens ‘Annabelle’ with its white flowers, is the only one to grow, more open and graceful in habit, its foliage a lighter green and thinner in texture. In the warmer months it is always an easy mass of flowers.


                                                                Climbing Hydrangea

There is a climber H. petiolaris, native to Japan, with aerial roots that attaches itself to walls, tree trunks, etc., in the same manner as ivy. It is hard to find and even harder to grow well. I have never had much success with it but I suppose I was just so wrong in its positioning and neglective in its care. But if you find a specimen for sale immediately grab it while you can. The successful specimens I have seen over the years are truly divine in their resplendent beauty.

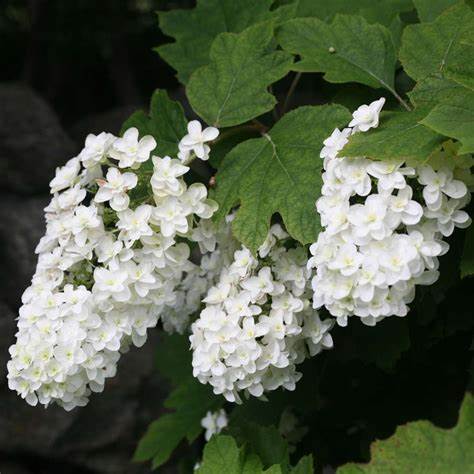
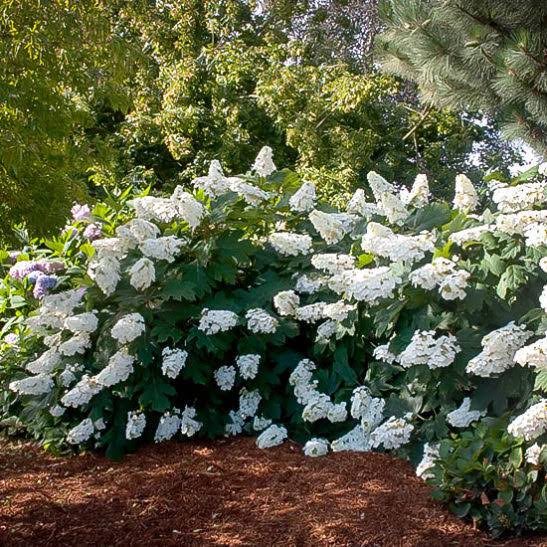
                                                              Oak leafed Hydrangea

H. quercifolia is native to North America. It has elongated cone shaped white blooms fading to pale pink as they age. Their distinctive decorative oak shaped leaves have the great bonus of very splendid autumnal foliage in shades of scarlet, crimson and gold. The colour and texture of its bark is also highly decorative with the colour a cinnamon brown with exfoliating bark that splits and peels. It is a great survivor for it can tolerate more sun and less water. It’s a must have even in a small garden and you will never regret it.

There is also H. paniculata, H. serrata and H. villosa, (and a ton more varieties) but they have their own blogs soon to be posted.

Pink or Blue?

People always seem to want what they don’t have, and with the flower colours of hydrangeas, it is a prime example. Where in general pink is by far the most popular colour, gardeners forever seem to covet the rarer blue flowers. Go figure.

Hydrangeas are native to neutral or acid soils, and thus the true flower colours are some shade of pink. So, if you want to change their colouring, from pink to blue, it is indeed a difficult path to tread and a fight against nature which is very hard to win. I have tried many a time with absolutely zero results. So I decided to just be happy and blessed with the flower colours that I am lucky enough to have.

However, if you still valiantly seek to follow the quest to change their colour, please understand the following. Simply, alkaline soils produce pink flowers and acid soils blue ones. The difference in colour is determined directly by the ability of the plant to take up aluminum and iron from the soil. Alkalinity locks up and imprisons the aluminium and iron in the soil, making it impossible for the roots of hydrangeas to absorb them and to produce blue flowers. On the other hand, acidity, with a pH 5.5, the aluminium and iron in the soil are naturally absorbed by the roots and thus will bear blue blooms.

To change the pH. apply soluble iron chelates or aluminium sulphate to produce blue flowers from as early as autumn.  I have completely given up after a zillion attempts. For me it is downright impossible, though I have had some good success with hydrangeas in pots.

Then there are the white flowering varieties. To me they are the most endearing and beautiful, I can never have enough of them. But they are also for another blog soon to be published.

                                                                   Oak leaf Hydrangea

Positioning

The optimum positions for planting are on the east or south. If they receive too much shade hydrangeas will be mighty recalcitrant and stubbornly refuse to flower. I have quite a few of these, with healthy robust foliage but absolutely zilch attempts to flower. On the other hand, with too much sun, the foliage will quickly wither and dehydrate, akin to the properties of done dead dry parched paper.

Planting

If ever there was the necessity for great soil preparation this is the time. Dig a hole at least 1 and a half times the depth and width of the plant ball. Throw in a couple of handfuls of Seamungus for energetic new root development, dig in and water very well. Next combine the best quality compost with cocoa peat and some dirt from the existing soil, and after teasing out the root ball, plant.

Finally, you should create a deep moat of good quality compost to surround the plant at least one and a half times wider than the potted root ball, and a good 10cm in height. Dress the area with very generous amounts of Seamungus and completing drench it with water. Repeat as often as you can. This will ensure the plant receives the vital deep watering it will need for future success.

Once established, I liberally dress with Neutrog’s rose fertilizer Sudden Impact and frequent regular applications of its sister product Seamungus to continually improve the quality of the soil, greater root development and overall general health of the plant.

Watering

You need to water, water and water especially in their younger years. Over time their root mass will expand and need less attention as they age. It is astounding how resilient hydrangeas are. When you discover a totally miserable plant with limp and lifeless, forlorn foliage, which you are certain is very close to death, just a good generous soaking on both the leaves and the surrounding soil,  will result in a  quick miraculous recovery.
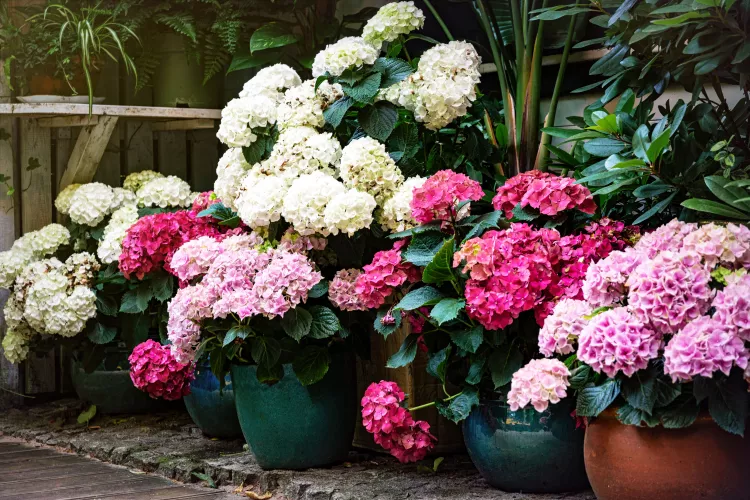
Pots

I grow about a half dozen hydrangeas very successfully in pots. They are all in quite large sized with deep saucers, raised up on hidden metal chairs, stands and even milk crates. They are always positioned at the back of a collection of other pots for two reasons. Firstly, their growth is quite high to about 1.5 metres or more, and secondly, the more forward pot’s foliage and flowers camouflage their winter bare branches. Living in pots they receive more frequent love and concentrated attention, especially in the act of watering.

Pruning and propagation

There is very strong advice about when and how to prune back hydrangeas in winter. Hydrangeas flower on old wood. When pruning your hydrangeas don’t give them an all-over hard chop in winter because you run the risk of removing flowering wood, which means you will get far fewer flowers or a longer delay the next summer. Just cut back the stems that flowered over the recent summer. Make your cuts just above a plump pair of healthy buds. Basically all you are doing at this stage is dead heading the bush. If your plant is getting too big and you need to prune it hard, do this during the growing season, as soon as the blooms begin to fade. That way the plant has a few months to create new fresh growth, which will give you greater blooms the following summer.

The exception is the relatively new ‘Endless Summer’ hybrid which flowers on new wood and thus have the ability to repeat flower throughout the whole season.

When you are pruning your hydrangeas, keep in mind that its worth using some of the healthy pruned material to make cuttings and increase your stock,  to as many as you wish. They strike quite readily. hard wood in winter, soft wood in the hotter months.

Hydrangeas are simply perfection as cut flowers. Their flowers are actually a collection of sepals called inflorescences. Being composed of sepals and not petals, they do not fall and remain on the plant right up to winter, changing to lovely shades of pink, red and even green, and thus are great for indoor decoration.

Throughout the year there are the ever popular cut flower competitions, for example, the roses and the dahlias, well I say bring on the hydrangea competitions. I will be there with buckets brimming full of my prized hydrangea flowers. I may well be chasing the winning blue-ribbon prize even though my blooms may not indeed be any shade reminiscent of the colour blue.

Happy gardening and have fun,

Regards Ned McDowell

The Mighty Magnificence of Monsteras


I love the name, tantalising and exotic, lush and luxuriant, its fruits good enough to feast on, and in hot climates feast you can. It is one of the natural wonders of the plant kingdom. Its huge popularity as an indoor plant has survived and even grown through the decades and very deservedly so. Few plants match both their uniqueness and beauty.

They are a no fuss plant, near impossible to kill, and thus the perfect plant for beginners or those with deadly black thumbs. I have seven mature plants in my own indoor and undercover outdoor plant collection and never have I experienced the sadness of a single passing of one. It is right up there in my top three favourite indoor plants and is yet another plant I just love to bits.

HISTORY

Monsteras is a member of the Araceae or Arum family. They are native to the tropical forests of the West Indies through to Central America. In their natural habitat, the genus monstera climb up the trunks and along the branches of trees, clinging to the bark by means of thick aerial roots, which not only anchor the plant to the tree but also help it to take up water and nutrients.

Monsteras have ever shiny lustred leaves and when mature may  grow up to 60cm across. The leaves are basically heart shaped but deeply perforated from the edges almost to the central vein. It is if an artist has beautifully crafted the incisions in the foliage. The reason for this unique foliage?  it is due to evolution. The breaking up of the leaf area helps the plants in the wild to withstand high tropical winds where the holes allow wind to pass through unhindered, preserving the large leaves from damage.

VARIETIES

There is a truly fabulous, variegated variety, called ‘Thai Constellation’ with its stunning cream and white patterned foliage. I have only one and it a total prize.  Sadly, it is near impossible to find and rarely if ever available. When first released, they were heavily advertised, though the numbers were severely restricted, only six per store and priced at the exorbitant amount of $200 apiece. Regardless it was a case of the Hunger Games, you would kill everyone around you to own one. They were sold out before they hit the floor. Loud complaints and raging anger duly followed for those who missed out. Today their price has halved to $99, but they are still very hard to find for sale. Bugger the price, get one when you can, for it will survive for many a year and you will never regret it.

There is also a smaller, miniature leaved variety M. adansonii, commonly called Monkeys Mask. It is super cute with its much smaller leaf size and its delicate leaf perforations. However, sadly for me it is nowhere as hardy in the cold months of winter. But maybe I will give it another go.

CULTIVATION AND CARE

Monsteras are relatively immune to neglect and lapses of care and attention. However as in most cases, if love and attention is provided, bingo, off they go in a blast of luxuriant new growth just like a ‘Jack and the Beanstalk’. They quite enjoy a slightly root bound existence, however you should repot every second year or so into a larger pot with a good quality indoor planting mix, that is one rich in peat or coco moss, until you reach a final pot size of about 300ml or 400 ml. After that just dress with new potting mix on top. Never sit it in direct sunlight. It will tolerate quite dark areas but not for extended periods of time. At times Monsteras have the tendency to become top heavy and venture sideways. Thus, when repotting you should include a moss pole to tie the stems and aerial roots to the pole.

General advice is to let the plant soil to dry out completely before watering again. However, for me in the hotter summer months, all my monsteras sit in a one and a half-sized saucers larger than the pot itself. This ensures that the plant receives a thorough drenching, and the excess water can be collected and kept in reserve in the oversized saucer and watered from the bottom up. When the reservoir of water in the saucer is empty, I water again. In summer it is twice a week and in winter once every ten days or so. You can fertilise once a fortnight if you remember.

Monsteras can also successfully grow in water. Two years ago, I placed a small broken off branch in water. Somehow against all odds, it has survived 2 years living outside under shade cloth, experiencing bitter cold winters, with temperatures of minus 8 degrees Celsius or more the norm. It is a mighty miracle and a huge halleluiah that it is still alive, though admittedly only a new leaf or two appear each year. I have never changed the water or added anything. I think it needs potting up, but it looks so very pretty in its large Italianate patterned jug, and I am a little bit very scared that if I move it from its present circumstances and change its growing media it may not survive. And so it stays as it is, good and happy.

Happy gardening and have fun,

Regards Ned McDowell.

The Crazy Addiction of Collecting Dahlias

Tis the season for buying dahlia tubers. In years past, I sadly and regrettably derided dahlias, considering them just too bold, too brash and too brassy. even downright gawdy. I know a few great gardeners who are stubbornly snobby and completely dismissive of them, well they just have to go and get themselves a fuller life. Today, I adore and love them. Maybe I have matured or most probably just grown up in life. And thankfully, it is about time.
Yep, I have become yet another one of those born-again passionate collectors of the great dahlias. I cannot get enough of them. Their flowers are pure dynamite, just don’t shut up flowering in the warmer months and are superb as cut flowers. The problem is where is the available space to grow them all. The varieties are thousands in number, it is hard to know where to begin, let alone end.

Going online you are practically assaulted by the boggling variety on offer. However, being a bit old-fashioned I prefer buying my dahlias tubers in person, in a retail nursery. Yes, the selection is more limited, though a good nursery should have over 60 varieties to choose from. Here you have the chance to physically touch and feel the individual size and firmness of each of the dormant tubers and thus their viability for future growth and future magnificence.

Mystery Day

Through experience I know full well the opportunity to buy them is limited in time, that is, the early weeks of spring. At this critical time, they are more popular and scarcer than toilet paper in the heights of a covid outbreak. Yes, time is short.
For me, when the long drought of their availability is over and they finally hit the nursery stands, a whole lot of super crazy begins. I am intoxicated with a feeling of a heightened blissful ecstasy, coupled with maddening moments of devilish desire, some may even call it insanity. There is now and then there is too late.

Mesmerised by the tantalisingly coloured glossy photos of each variety, and with both my hands in a furious and frenetic speed of motion, I attack the multiple display stands of dahlias. With my left hand I quickly grab the proffered dahlia packets and pull and yank with my right. I must have this one and I must have three at least of that one, the philosophy of mass plantings and all that. And on it goes. I will not be denied. Remember the time of their availability is short. In scant minutes my nursery basket is heavy and overflowing. A second basket is promptly needed, and my manic joyful activity continues. I must have the cacti, the pompoms, the waterlilies, the giants, and on it goes.

Bishop of Llandaff

Then there is a momentary standstill, a brief blink of reality strikes. What am I thinking? Where the bloody buggering bollocks will I plant them all? The available area free in my garden is acutely limited. Oh, what the heck, and with great glee I take them all, a good three dozen and a whole lot more. I promise myself that I will solve the silly and totally irrelevant question of where to plant them to sometime down the long track. Yep, I am still in the immediate throes of a crazy madness.

Three weeks later I regret nothing. The majority have been lovingly planted. I adore them all, every single chosen dahlia, as if they were my own little children. I am a very happy fella. I still have a half dozen left to plant, not quite sure as yet as to where exactly,, still hunting for any more 50cm of vacant spaces.
Having had so much fun, with next year’s spring, I will enthusiastically do it all over again, and I cannot wait. There will be no entries in the highly competitive dahlia contests. They are for my own secret pleasure. However, if someone kindly wants to buy some of my splendorous and majestic blooms as cut flowers, I won’t say no. It will help finance the future purchases of even more dahlias to add to my forever expanding collection.

That is, of course if I can find any more room to plant them. I am keenly eyeing of the next-door neighbour’s back garden. Well, you can only dream. But if you work hard enough, we all know dreams can indeed come true. I will keep you posted.


Happy gardening and have fun, regards Ned McDowell.

the sassy spider plant and her little spiderettes


The Spider or Ribbon plant is one of the best and most decorative performers amongst my indoor plant collection. It’s sassy, it’s sexy and I love it to bits. Why? It’s tough, it’s resilient, and has been around since forever, which aptly speaks for its hardiness and its ease of care. And as I often declare, you can never enough of them. I have more than two dozen plants hanging outside and another dozen or so in single pots which live on high shelves both inside and outside.

My love affair for the spider plant began many years ago. A few months after I purchased my present house and garden, I discovered a single specimen living quite merrily under my long staircase which leads up to my first floor verandah. Basically, the area was a dumping ground for old, shattered pots, broken bricks and discarded unusable large ugly rocks. Out of sight, out of mind. The soil was non-existent and rarely if ever received any sun, rain or moisture. It had survived total neglect outside through hot summer days and freezing winter temperatures. It was a miracle it had ever survived. It was a true lesson and full testament to its toughness and longevity no matter what conditions. I promptly potted it up and from this first neglected specimen my collection began.


History
Chlorophytum comosun is a member of the Liliaceae family.it comes from South Africa and was first introduced as an indoor plant in the mid nineteenth century to Europe and America. The Latin name Chlorophytum means green leaves which originally it had. The variety now universally grown is C. comosun ‘Variegatum’, that has a prominent white stripe down the entire long length of its leaves, thus one of its common names the ribbon plant. There are newer cultivars, one with wider and fatter leaves, another with tightly twisted, curled leaves, and a smaller miniature leaved variety.

Description
During the active growing season, the spider plant throws out long cream stems, 30cm to 60cm in length, adorned with small six petalled white flowers, called spiderettes, which collectively resemble a mass of starry constellations. These in turn are succeeded by plantlets with miniature versions of the parent plant appearing either singly or in groups. These plantlets weigh down the stems as they develop, rapidly producing roots, which in nature would grow into the soil around the parent.

Design
Their unique long striped white and green ribbon leaves and their accompanying spiderettes which grow, descend and hang heavy around the parent plant, make them the ideal candidate for hanging baskets. This added height gives you the perfect opportunity to fully admire their decorative magical majesty. En masse, say 5 or more all in a row, or even staggered, the effect is superbly beautiful and so simply easy to achieve. In addition, their ribbon shaped leaves can create stunning foliage contrasts, through colour, shape, size and texture with other hardy indoor plants such as Ficus, Monsteras and Aspidistras. The list is truly endless and is only limited by your own imagination and savviness as a decorator.

Cultivation
Like many of the hardiest plants they can survive practically anything. They are very tolerant of drought and neglect and will not die if you occasionally forget them. In fact, some say, dryness may actually encourage them to produce more stems, flowers and plantlets. They are very tolerant of dark places but given good light they respond exponentially in their performance. Ideally you should keep the soil mostly moist during the spring and summer, watering 2 to 3 times a week but only once a fortnight in winter. Feeding with a soluble indoor plant fertiliser once a fortnight is strongly recommended. You can clean the leaves by spraying them all over with tepid water from a mist sprayer. They grow well in water and convert easily to hydroculture. In extreme cold weather with heavy frosts, the leaves may indeed melt but in spring the foliage quickly bounce back to their former glory.


Hanging baskets are notorious for the soil to quickly dry out. So what basket is the best? I don’t especially like plastic hanging pots, for they look a bit ordinary, even ugly. However, they are better suited for holding water and also possess an attached saucer, which provides an extra reservoir of moisture. I much prefer the baskets with a metal framework lined with coco fibre, looking far more natural and aesthetically pleasing. Alas they are not in the least bit practical. In short time, the fibre shrinks and deteriorates, and they cannot hold the necessary water. Thus, to solve this problem I always line them with plastic, with enough holes to guarantee good drainage.

Propagation
As the plantlets grow larger leaves and aerial roots, they can be planted beside the parent plant and after about 6 weeks the stem can be cut away. I rarely if ever follow this method. I just cut the descending stem of the plantlet and directly plant it in soil or water. You can also propagate by root division, but I find it a rather messy affair and the plant takes some time to recover.

Happy gardening and have fun,
Regards Ned McDowell.

How to Have a Bumper Crop of Tomatoes for Christmas

Yes, it is that time of the year, the beginning of the tomato growing season and a whole lot of stupid crazy takes possession of the general populace.

The weather warms, the sun kisses the cheeks of the face and the scent of spring hangs fresh in the air. The biting frosts seem to have abated, farewelled and forgotten, with scant thought of their future certain return.
And thus, the great gamble begins. To compete, even cheat the might of mother nature. It is the ultimate game of chance, a continuous throw of the dice, a repeated spin of the weather wheel. It is when the merry waltz of early spring’s optimism, is so very darkly partnered with the dangerous dance to dodge the deadly bullets of late frosts. Yes, it’s a real game of Russian roulette.

Thankfully today, we have access to 7-day weather forecasts, updated twice a day, so the odds of success are greatly enhanced. Local wisdom advises that you should wait until the Melbourne Cup has run to plant out your seedlings.
However, if you don’t begin a good 4 to 6 weeks earlier you will be impatiently awaiting your first crop until way, way after Christmas celebrations have come and gone. Tomatoes need a good three to four months of hot weather to produce flowers, then fruit and ripen successfully. If you have a heated greenhouse, you can certainly start earlier. But for me, it’s to prepare the soil early, wait with great and singular patience, then buy the plant and put it in the ground, no fuss, little work, just easy as. If a frost is predicted, which will be certain but rare, I wrap it with a few layers of frost cloth.

For me late September to early October is when my tomato growing season begins in earnest and my own fine gamble commences. In both pots and in the ground. Any earlier the plants will sit, stubbornly stationary and just simply sulk. For the days are not hot or long enough and the soil is still too cold.

I grow only the cherry and grape varieties. This is because they mature and crop a good 4 to 6 weeks earlier than larger varieties, their fruit rarely split and most importantly they are immune to the wrath and scourge of fruit fly. There is one great exception, the large Black Russian. In addition, I only ever plant advanced large single plants, and again you are ahead in their time of growth by another 3 good weeks or so.

Being a one-person household, plus a voracious feeding, ‘Big Daddy’ possum and an alcoholic cat from next door called just ‘Cat’, as companions, I believe 3 plants should be just about enough. Throughout the season, other than the daily tossed salads, I will need tomatoes for the hearty breakfasts, the sandwiches, the stir fries, the soups, the sauces, the dips, the Thai jams and relishes, the chutneys and the obligatory gifts to others. And then so mightily important, are the cocktails of chilled vodka splashed over the before prepared and frozen, boulder sized ice cubes of the combined and blended Black Russian tomatoes and Bloody Mary ingredients. On a hot summer’s day, it is my drink of decadence, and I know I very well deserve it. Yep, maybe 10 or even a dozen plants would be better.

My goal and yours is to harvest a good 10 kilos of tomatoes per plant and the first harvest to coincide with Christmas celebrations.

Soil preparation
To begin we need to look at the most effective fertilisers for growing tomato plants. It is essential they have high NPK ratios for they are the greediest of plants for food and nutrients. I use Sudden Impact, a reputable rose fertiliser which has an NPK of 10:4:6. This great concentration of nutrients is why it is so expensive to buy. In comparison are the animal manures which most gardeners use to fertilise their tomato plants.
Chicken fertilisers have a NPK 3.5: 1: 1.5. horse manures a NPK 1:02:03 and cow manures 2:1:2, so both should be used only as soil conditioners. Thus, for the best fertilisers to use I will let you do the maths.

This is my recipe for the optimum soil preparation for each single plant. Soil prep in pots and raised garden beds are the same, except the compost is replaced with potting mix for pots and ½ potting mix and ½ compost for raised garden beds.
• 2 hand full of charcoal
• 5 hand full of Seamungus
• 1 ½ hand full of rose fertiliser
• ½ bag or more of the best quality compost,
• ½ handful of lime
• ¼ handful of potash

Charcoal – This is a trick I learnt from Peter Cundall, the iconic former host/presenter on Gardening Australia. The charcoal stores the tea tonic of combined water, fish and seaweed and when in summer the growing roots of the tomatoes reach the charcoal an explosion of growth will be certain to follow.

Seamungus – I would literally sell my soul before not using this product. It is a commercial pelletised fish and seaweed product which promotes a profusion of invaluable white root growth of more than 50%, which thus means the plant can take in more food and water. It is not a fertiliser per say, but a tonic, so unlike fertilisers you can never apply too much. It also greatly enhances the quality and texture of the soil, acting like water crystals in conserving water and invites greater microbe and worm populations with their consequent highly beneficial activity in further improving the condition of the soil. In essence it creates healthier plants with greater resistance to disease, heat and water stress. It’s a total bingo product for every gardener.

Lime helps in preventing future splitting of their skins and blossom end rot of the fruit. Potash is essential for flower and fruit production. It promotes water absorption through the roots and helps break down the sugars so they can be taken up by the plant as food. It also creates greater immunity to pests and diseases.

Planting
• I plant each tomato one and a half metres apart, to accommodate a full season of growth.
• In a large bucket of water toss in about 3 full handfuls of Seamungus and stir well for a day, to create the tea.
• Place 3 handfuls of charcoal into the tea and let it steep for a few days until it has absorbed most of the tonic liquid.
• Dig a hole as generous in width and depth as possible.
• Throw the charcoal into the bottom of the hole and dig in loosely. Any extra tea of Seamungus can be used for watering in after planting.
• Combine in a large bucket a small portion of the excavated soil with the compost, fertiliser, lime, and another handful of Seamungus. Your own soil will have a portion of the worm eggs and microbes you need to create a healthy soil.
• Very importantly you should cut off the lower leaves and branches and the bury the stem in the soil by about half its overall height. This will create new roots along the buried stem, thus strengthening both the stem and the plant.
• Backfill with the prepared planting mix.
• Ensure the seedling is planted in a surrounding large and wide and at least 10cm high moat of compost, so deep watering is possible throughout the coming season.
• Like icing a cake, top with the last handful of Seamungus and a final sprinkling of potash for good measure. Water deeply and mulch with sugar cane.

Staking and Pruning
There is an abundance of advice about pruning your tomatoes for greater cropping. Prune this leader, layer that lateral, cut here and cut there, do this and do that with each truss. I find it all too confusing and challenging and I am too time poor or even downright just too lazy to bother with it.
So, bugger all that. As the plant grows, I just hammer in another stake about 50cm away and tie each new fattening long stem with grafting tape, which is elastic and forgiving enough not to damage and cut into the expanding growing stems. Then I just let it all happily continue to scramble and climb at its own leisure. As the growing season continues, each plant at it grows upwards and outwards, receives at least 3 to 6 stakes. The increased foliage also acts like an umbrella or canopy to protect the fruit from the harsh summer sun.

Watering
For a successful crop this is probably the most vital and mandatory task of them all. At the height of summer tomatoes are the thirstiest of feeders. Deep and regular watering is essential for their growth and health. Intermittent and shallow watering leads to poor growth, the size of the fruit, the splitting of their skins and the loss of the fruit’s juiciness and flavour. This is why the regular maintenance of the high moat of soil surrounding the tomato is so important.
Always water at their base of the plant. If you water the plant from overhead too often, the foliage will succumb to the disease perils of mildew and blight.

Companion planting
Regarding companion planting, tomatoes are said to grow well with basil, parsley, all alliums, asparagus, and nasturtiums, and it is often stated marigolds will deter aphids and fruit fly.

Further fertilisers and tonics
When the tomatoes produce their first truss of fruit, I apply further applications of Seamungus followed by the same recipe of fertilisers mentioned when first preparing the soil, but at half strength. At this time, you can also dress them with a liquid potash fertiliser weekly, to encourage further flowering and fruiting.

Happy gardening, good luck and have fun. I hope you have a bumper crop by Christmas.
Regards Ned McDowell

Let’s Twist Again With the Rose Scentimental

The floribunda rose Scentimental – you either love it or you hate it. I suppose it all depends on your individual tastes. Many years ago, a lady customer once asked me, her question I immediately realised was a thinly veiled criticism of my tastes, “and you probably like the rose Scentimental?” Raised to be a gentleman, I didn’t immediately bite back and yell f*ck off, so I replied with as much enthusiasm and good manners as I could muster, “Yes it is a great rose, I love it, and I could not live without it.” To this day I still do, and this grand rose is the most complimented rose by far by visitors to my garden.

The rose is big, it’s bold, it’s brassy and for me it’s very, very sexy. Each and every bloom is splendid in their own uniqueness, no two are ever the same. The petals are beautifully striped, with the background a rich blend of deep burgundy and crimson pink, and the beautifully stripes and swirls are a clear white, their number and width varying from flower to flower. They have a strong spicy scent, not overly so, but still strong enough to justify its name. They are excellent as a cut flower, their foliage is a rich green and is practically immune to blackspot. Their greatest and most unforgettable feature is that for a rose they just ‘don’t shut up’ flowering.

Scentimental was very deservedly the first striped rose to win the AARS award in 1997 and remains a leader in the new generation of striped roses. It was raised by a Tom Carruth, in the USA in 1997, its parentage a cross between Playboy and Peppermint Twist.

I have 5 specimens in my own garden. I only prune them every second year, not due to my indifference, neglect or laziness, but because they just don’t need them. Each year they remain bushy, from their base to their top, and are forever clothed in a grand profusion of stunning scented flowers. Their heights are all a good 2 metres.

If I had the room I would plant a long hedge of it, say 10 to 16 plants in number, about a metre apart. In front of it, I would plant a second rose hedge, a combination of David Austin’s Munstead Wood, a deep crimson, and Clair Austin, a pure white, both low in height and habit, and both blessed with the perfumes of perfection. The two would also provide a great colour complement to the taller Scentimental hedge behind. At their feet I imagine I would plant of long froth of catmint and white Californian poppies. I believe it would all look pretty super and groovy. Maybe in the future a client may be brave enough to plant this simple design. We shall see and only hope.

Happy gardening and have fun,
Regards Ned McDowell

California Poppy Dreaming


I’m often asked what is my favourite plant? Easily crowning the top of my list are the annual/perennial, prolifically self-seeding Californian poppies. Why? It’s because this poppy is what I call, the “it just does not, ever, ever shut up flowering” plant.
Their fantastic asset is the longevity and easy freedom of their effervescent froth of flowers. The delicate, silky textured, transparently thin petals come in the colour varieties of hot yellows, a rich range of oranges, the softest of pastels and cream and white. A sunny position is mandatory.

Even at night their flowers are still superb. The petal’s colours remain true when snapping tight shut at dusk to create a perfectly folded, whorled spiked shape, reminiscent of a grand field of mini tulips. And then, when the morning light arrives, they again unfurl their petals and produce yet another full day of stunning beauty and glamour.
The foliage itself is highly attractive with its feathery grey green leaves. They provide essential leaf contrast with their neighbouring plants, a vital ingredient in any good garden design. In winter they look marvelous with the morning frosts hanging heavy on the leaves.

Yes, many may call it an incorrigible weed, old fashioned, garish in colour, as common as dishwater. Well pity them. If it is indeed a weed it is a weed you have to have, which I will encourage forever and a day.


The poppies botanical name, Eschscholzia, must top the list for the most unpronounceable name of any plant, and after many years I forever still misspell it. Its name is all due to a certain Johann Friedrich Eschscholz, a zoologist, who was a member of an expedition that sailed to the Pacific coast of North America, way back in 1816, and it was his name that was used to identify this genus of poppy.

This genus belongs to the poppy family Papaveraceae. They are native to the California regions, found in semi-arid, prairies and pasturelands. and is the official flower emblem of the state. Thus, its common name is the Californian poppy.
The varieties available commercially in small pots include ‘Milky Way’ a cream colour, ‘Purple Gleam’ a dusty pale pink, and my total favourite, ‘Red Chief’ a vibrant red orange. There are also many great varieties available if planted from seed available in store or online.

The poppy is the first jump out of the winter doldrums and will continue to shine so stunningly until late autumn. A long succession of heavy winter frosts may subdue the proliferation of flowers somewhat and there is a week or two in the height of summer, when the plants seem exhausted and divert their energy to scattering their seeds magically far and wide, but so very quickly, they bounce back into their top flowering mode.

Cultivation
The Californian poppy is renowned for succeeding splendidly with little to no attention or care, growing in the most impoverished of soils, and in my own experience, even in heavy clay. However repeated applications of tonics and fertilisers, and frequent watering will result in even better well-rewarded greater blooming spectaculars. They adore the sun, for if they are planted in shade their flowers are reluctant to open.
Poppies just abhor a life in pots. Even from their infancy they are difficult to keep looking healthy when on offer in a nursery. This is because, like all poppies, they possess a single tap root and much prefer the open soil of the garden bed.
You will find that the flowers make the bees mighty happy. For me, the only drawback of the poppy, which is only minor, is that the ever-busy buzzing bees continually cross pollinate the flowers, and the newer self-seeding plants’ flowers, may well revert back to a single mid-orange or a canary yellow colour. But they are still beautiful in their richness of colour. The exception are the cream/white varieties which stay true to their colour, even at times transforming into the purest of clear whites. Simply heaven.


Design
Californian poppies are the ideal plants for cottage gardens, prairie landscapes, really any garden design, no matter how simple. They are perfect in my potager, great companions with the large rich purpled leaved cabbages, and with the other merrily proliferating self-seeding rich ruby ribbed silverbeets, parsley, spring onions, leeks, Tuscan kale and rocket.
You can throw them in with salvias and penstemons, seaside daisies, gauras, echinops and eryngiums and are perfect with the blue flowering convolvulus groundcover. Basically they can sex up any of the most dullest of surrounds.
They are a great friends and accompaniments with roses, masking and disguising their lower bare trunks and stems. In addition, they are the great answer for covering and camouflaging the unsightly withering leaves of spent bulbs such as tulips and daffodils.

Californian poppies are truly a must win plant for every garden. This is because of their magical beauty of both their flowers and foliage, the longevity of flowering period, their great bee attracting properties, their ease of care and their phenomenal self-seeding proliferation.
For me it the most valuable of plants, which my garden and myself could not live without. Long live the California poppy.

Happy gardening and have fun,
Regards Ned McDowell.

The Opium Poppy Which Will Not Let You Sleep


I adore opium poppies, Papaver Somniferum. My first ever seeds originally came from a great country garden in Moree, South Muckie Buckie owned by Caroline Humphries. Every year I am totally bonkers in my obsessive pursuit to discover new, rare, and scarce seeds. My own personal holy grail are the seeds of the elusive and stunning double white flowering opium poppy.
Known as the poppy of sleep, yes, they can indeed make opium. However, it is completely beyond me how. Secretly, I must confess, I have tried, only for the whole process to be a complete failure.

But the same cannot be said of the annual visit of the dastardly night-time opium thieves, for they certainly do know how. In the dead of darkness when all is quiet and still, they cut and harvest the plump green pods. Thankfully they do leave some to self-seed, I suppose to guarantee another future crop for themselves in a year’s time. At first, I thought birds were the nasty culprits, but with no stoned avians happily relaxing and lying around flat on their backs, that theory was immediately thrown out.

The opium poppy can grow to a good 1.5 metres, the flowers can be as big as an outstretched hand, with petals like the most finely spun silk, so tissue thin they seem transparent. They come in a myriad of colours, hues and shades.
For me the leadup to their flowering creates this great fevered sense of expectation. For a good three months I have watched and tended both their growth in height and the swelling of their flowering pods, awaiting that magic day when all their treasured beauty will open and be finally revealed. Yes, you want to peel the pods open, just that little weenie bit, to divine a hint of their coming colouring, but that’s cheating, and with growing poppies impatience is not rewarded.


And then as in a miracle, the poppies flowering season finally begins. Every morning, with the rooster’s crow, heralding a fresh new day, I leap out of bed and gaily skip down to discover each successive newly emerged flower.
Will they be a pale shell pink or a vivid hot one, a magical magenta, a tantalising tangerine, a rich blood red, or even a combination of them all? Will the flower petals be a single, a double, even a peony shape. Or most fantastic of all, have the bees last year magically cross pollinated a particular poppy to create a new and original flower. One can only dream, and as everybody knows, dreams can indeed come true, if you try hard enough.

The cultivation of opium poppies is dead easy. The optimum time to sow seeds are from mid-autumn through to late winter, the earlier the better. The bed must provide good winter and spring sun. Combine and mix the seeds with a little bit of compost, potting-mix or sand, really whatever you have on hand, and cast it over bare soil. Hopefully the soil has already been prepped with composts, seaweed/fish tonics and fertilisers, for this will guarantee a bonza crop. If not, don’t despair, throw the seeds anyway for they will still perform well enough even with the poorest of soils.

Growing them in pots is generally not advisable because they possess a single long tap root which can be handicapped by the pot’s contained size. Myself, I have had poor results in growing them in pots and have given up the idea completely.
If at present you do not yet have any seeds of the opium poppy, beg, steal, or borrow. Try every method available to you, call in favours, even pleading down on your knees. Ask anyone or everyone, your garden friends, members of local garden clubs or even online for some freebies and begin to build up your own collections.


I am told the cultivation of opium poppies are illegal in Australia. However, unless you are growing them over a few hectares or every inch of your own garden, the police will never arrest you, and charge you with any major drug trafficking offences. There would have to be a massive national crackdown of the many thousands of suburban gardeners who grow them, all bundled instantly into newly overpopulated and overwhelmed jail and prison systems. And that ain’t never going to happen. Never ever.
For as we all know, we are only growing them to create a more beautiful world for all to share and enjoy, and the opium poppy seeds we harvest are strictly used only for culinary pursuits, that is, for the toppings of breads, biscuits or cakes.

So, stand up strong to such restrictive and antiquated laws. Be a little rebel, adopt an ethos of bloody buggering bullocks to big brother. Sow the opium poppy seeds of as many as you can, even if they are relegated to the back garden, hidden to others, but thankfully not to yourself, where their joy and stunning beauty can be fully appreciated each and every spring.

Please check out my other blogs of the Scarlet Red Flowering Flanders Poppy and the must have Californian Poppy.

Happy gardening and have fun,
Regards Ned McDowell.

The Indoor Plant You Cannot Kill – Aspidistra


You cannot kill an Aspidistra. This indoor plant is the greatest of survivors, simply indestructible. I have had a very long love affair with this noble plant. They are the easiest and bestest of friends. They require little attention and are forever forgiving of forgetfulness and neglect. Their longevity is astounding. I always state that the plant is guaranteed to outlive you. The aspidistras common name is aptly called the cast iron plant. There is no other indoor plant that I recommend more highly.
If in fact you do achieve the impossible and murder one, please, I impeach you, give up immediately, and never buy another living plant again. Plastic plants or floral wallpaper are your only future options.

Very often I am asked by customers what is an indoor plant which will survive with little care and little light and the extremes of cold. Straight up I recommend the aspidistra. I declare that this plant can be thrown into a dark cold cupboard, shut tight the door, travel to Europe for 3 months, and upon your return, open the cupboard door, and the aspidistra will still be stubbornly alive. Yes, it will look mighty sad, its leaves collapsed and withered. Yet with a basic level of attention and care, it will be quickly revived and resurrected as the best and most decorative of all indoor plants.

The Aspidistra is blessed with highly decorative shiny, dark green leathery leaves 50cm long, 10 to 20cm wide. The luxuriant leaves rise from a creeping rhizomatous root stock lying half buried in the potting mix. There is also a variegated form, highly sought after, with white- or cream-coloured stripes of varying widths running the lengths of the leaves. If you are mighty lucky you may be privileged to see one of their very rare flowers arising from the surface of the soil. There is another variety with small minute speckles on the leaves, but I find it downright ugly, for it looks like it is riddled with scale.

The Aspidistra originates from the Himalayas, China and Japan. In the past few years there has been a lot of modern hybridising of the plant, in Japan especially. The accompanying photos are testament to this. To date, few of them are presently available in Australia.

A bit of Imagination may be needed when initially purchasing your very first specimen. Firstly, I admit the young plants of aspidistras are not sexy. They can be casually overlooked when surrounded with other more tantalisingly coloured, shaped and textured exotic indoor plants on offer in a nursery. Aspidistras don’t scream I love you and take me home. Secondly, they are always only available in 200mm pots, displaying only 2 to 3 leaves and are marginally expensive. But don’t let that you put you off, look to the future and the rewards will be great, for you will never lose one single plant.

Cultivation
If I remember, and that is not often, when I water them, I rotate my many plants from poor levels of light to rich levels of light, and vice versus, in order to maintain their overall health and performance.
Positioning – optimal is a well-lit position, but will survive in the darkest of indoor areas, and if cultivated outside in the elements they will tolerate harsh frost and full sun.
Watering – every week in summer, in winter once every month, when I remember.
Fertilising – liquid fertiliser once a fortnight in summer. Again, when I remember.
Cleaning – sponge the leaves with water to remove dust, never with leaf shine or soap. Spray once a week with water. But I never remember for they don’t really need it.

Propagation
In spring I gently divide roots in half and repot in good quality potting mix, preferably suited for indoor plants.
Today my own collection of aspidistras numbers well into the high thirties. Each spring, when I remember, I split and divide every plant, instantly doubling their numbers. The majority are used as great gifts for birthdays and Christmas presents and most especially as housewarming presents.

To my friends and family, I have casually declared, partially in jest, earnestly in truth, that I want the cut leaves of my many potted aspidistras to dress and adorn the top of my coffin. There will easily be more than enough. Then for a further layer, toss some strands of homegrown ivy and a generous layer of my David Austin roses and wallah, it will be just so perfect. With this great monetary saving, I can only imagine the extra money available to the mourners for bubbly. It should be great celebration. Now for the music. ‘See you later alligator’? I will get back to you on this one.

Happy gardening and have fun, both inside and outside the house,
Regards Ned McDowell